Editing Engineer Test Result Sets
Engineer Test Result Sets are the questions that an engineer will see when attending a service.
Once created they can be selected and deselected when scheduling in a timeline or diary entry by clicking on the tab titled Test Results.
You can add, change or edit a test result set in a number of ways.
- Create a brand new set for a new discipline.
- Create a brand new set for an existing discipline.
- Edit an existing set, adding new questions.
- You can set a question(s) to show or hide allowing you to disable the question without deleting it.
- You can delete a question entirely from a test result set ( as long as it is not a system question in which case delete is disabled)
- You can alter the sortation of questions so they appear in an order that you prefer.
To load a test result set Select the following from the Main Menu:
1. Settings - Test Result Sets
2. Select a Purpose then a Sub Set to view/edit an existing test set.

Use button marked 1 to add a New Purpose for any Other System types
Use button marked 2 to add a Test Set within the current Purpose selected
To add a question - use the New or Copy buttons to the right hand side along with the Save button to commit the changes to the database
3. Add a new question, edit an existing question, show and hide an existing question or change the sort order in this view
- To add a question - use the New or Copy buttons to the right hand side along with the Save button to commit the changes to the database
- To edit an existing question click on the blue button to the left of the row,
- To delete it click on the red X
- To show/hide the question click on the coloured circle icon ( red indicate invisible , green indicates visible)
System questions can not be edited or deleted

To show and hide the system questions , click on Exclude System check box at the top right of the screen.
To set the current question set as the default for that Purpose click on the Mark as Default on the top right of the screen ( these will then always be selected by default when a timeline/diary entry is created although the user has the ability then change that set in Timeline/Diary for that appointment).
To set the current question set as a Shared set (this means they will be visible for all Disciplines in the Timeline selection view)
Add, Edit or Copy a Question
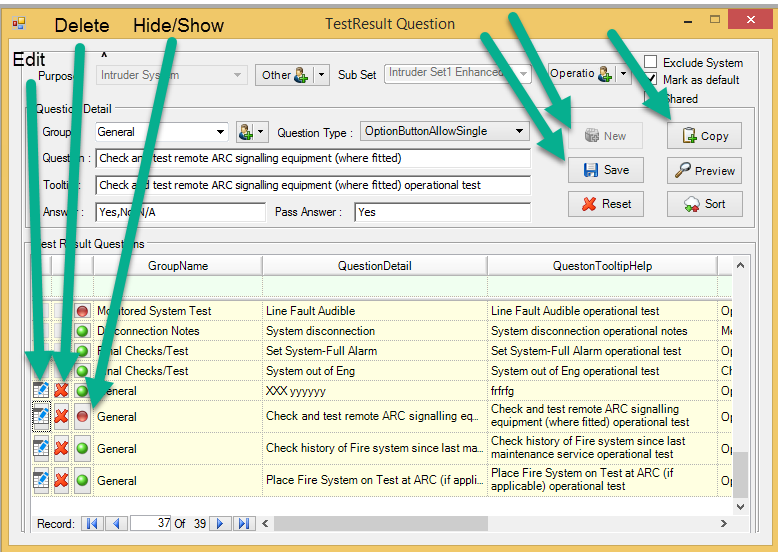
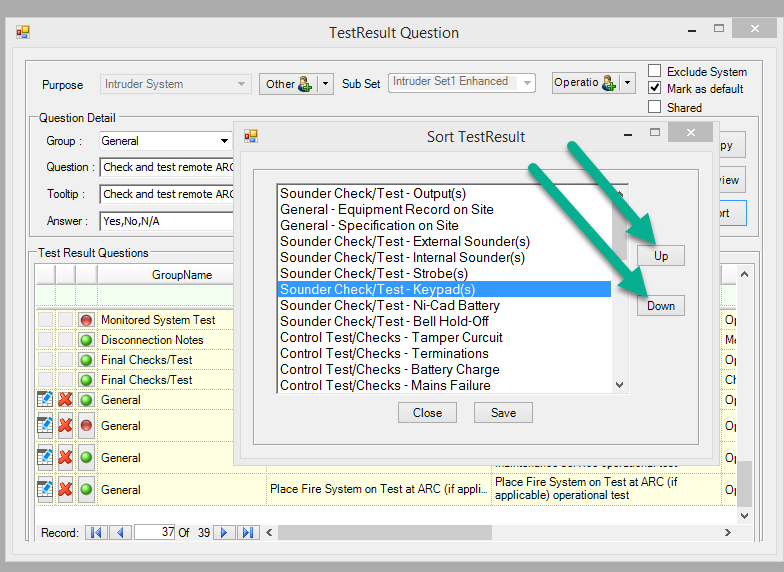
Changing the Sort Order on a question
- Click on Sort on the Test Results screen
- Within the sort dialog select the question and use Up and Down buttons to move the position of the question
Related Articles
Changing Test Result set for an Existing Appointment
There may be times when you wish to change the test result set associated with an appointment. In order to do that follow these steps. Open the Timeline and locate the entry in the Diary or Timeline view and edit it. To Edit it - Right mouse click ...Producing Service and Jobsheet Results after Engineer visit (for admin users)
After an engineer has attended an appointment and undertaken the work and possibly completed the test results, a service docket can be sent by email directly from the Jobs Module. Upon emailing the document, Tracker Pro will additionally file the ...Sample Service Reports
Service Reports which will be generated off the shelf without any customisation are included below. The Two Reports that have been used to generate these outputs are contained in the Jobs Module and are the following two : TestResultJb2.rpx - ...Automated Gates and Barriers Example
Automated Gates and Barrier system service dockets generated without any user customisation Service Reports which will be generated off the shelf without any customisation are included below. The Two Reports that have been used to generate these ...Allocating more than one engineer to a Job,Quote, Call or Event in the Timeline
If you wish to add two engineers to the one Job, there are a number of ways you can achieve this. 1. Select more than one engineer when scheduling the Job. To so that hold the control key down and select more than one engineer in teh engineer list ...